

To see if this custom-fit item will work for you please tell us what vehicle you'll use it with.


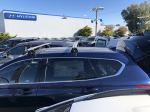
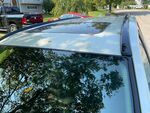
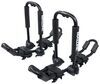
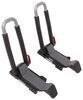
This stylish, aerodynamic Yakima roof rack gives you the space to carry gear on your vehicle. Rubber strips in the top channels push down to load carriers or accessories - no need to trim. Installs to fixed mounting points on your vehicle's roof.
Features:
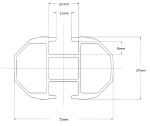
Specs:
 Alternate Instructions
California residents: click here
Videos are provided as a guide only. Refer to manufacturer installation instructions and specs for complete information.
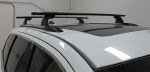
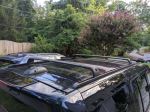
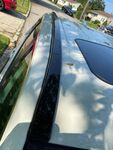
Hey everyone, I'm Evangeline right here at etrailer. Today we have our Yakima roof rack system and I'll show you how it looks, how it works, but also how to install it specifically on your 2022 Toyota RAV4. Now for your different trims as well as your different types of RAV4 models, this will fit if you have a version with the raised rail. It is a custom kit, so let's go take a look. There's plenty of roof rack options for the RAV4, but a lot of people like the Yakima version because the crossbars, the tower, and the custom fit kit, they all go together. However, if you wanna take off your roof rack real quick, it's simply a matter of opening up the doors and you can lift it off.
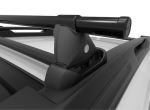
So for those that may not always want a crossbar on their vehicle but they want it easy to just put on there in case you need to carry some fun gear like a roof box or a kayak, this might be the kit that you're very interested in. This kit currently has the black JetStream bars, but you can get different Yakima crossbars depending on what you need. A lot of people like the JetStream bars though. I like them too. They're very versatile.
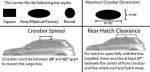
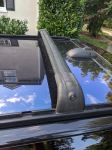
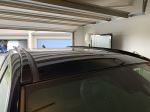
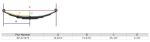
They can carry a bunch of stuff. Now you can see the length of our 50 inch bars. Did you know the front and the rear are the same Length is just the curve of the roof that gives you different overhang. So overhang is measured from the tower to the usable end of the bar. In the front we have almost three inches.
In the back we have 4-1/4 inches. You can see the difference there when carrying things that changes because of the curve of your roof. This kit secures to the fixed points of your flush rail. So they go to very specific spot, front and back, which gives you a specific crossbar spread. If you we inchesre gonna measure center to center, you'd get a measurement of 32 inches apart which is actually on the pretty far end for usability with all types of different accessories.
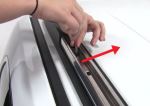
So why would you care about the different numbers said in this video so far Depending on what you're carrying, let's say a roof box or roof basket, you'll want a certain crossbar spread and you can check out those numbers on our page if you're not sure what you need. Now for other items, it also tells you how many items you can put on there. If you wanna carry two kayaks or four kayaks or skis and snowboards, you'll want to know how everything fits together. This does sit pretty high up on the roof. So there's two measurements there. One is gonna be the distance from the top of the roof to the bottom of the bar and where I measure specifically I see around 4-1/4 inches. That's gonna change the depending where on the curve of the roof you're measuring. Now this is a lot of height, so most accessories with clamps, even the U-bolts and wing nuts, you are gonna be fine. If you have this sunroof, which is what we have here, you'll have plenty of clearance. The next measurement is gonna be the height added in total. So top of the roof to top of the bar will range from 5-1/4 to 5-1/2 inches of height. And that's helpful 'cause that's where your cargo sits. So let's picture skis with extra tall bindings. You wanna make sure there's enough clearance with those bindings so you're not scratching up your roof. With this setup, you'll be good. Now, if you we inchesre to carry a longer item like a kayak or a ladder, you'll wanna be interested in how much hatch clearance you have. So when you measure from the rear bar to the closest point on our door here, that's gonna be 28 inches. So that's plenty of clearance. This is gonna be super helpful for carrying all kinds of things. If you do carry a super long canoe, just be mindful of the length it'll add to the back of your car and just maybe not open the door all the way. This roof rack is a great fit on the RAV4. If you are looking for extra clearance to carry all kinds of longer or maybe taller items and still clear with your car, or if you're looking for something that can be easily taken off. If you wanna just put the caps on, maybe you wanna open up your sunroof and you don't want the crossbar in the way. However, it is important to think about what you're carrying and if it will fit well with your crossbar system. For example, if you have Thule accessories, you may wanna stick with a Thule roof rack. If you have Rhino-Rack accessories, you may wanna match it up with your Rhino roof rack. But if you have Yakima accessories and there are plenty of roof mounted Yakima accessories and you want it all keyed alike, this is gonna be a great option for you. I think it looks great, it definitely does work great. In fact, Toyota and Yakima have worked together with all kinds of product partnerships. So you'll see a lot of Yakima roof racks on Toyota vehicles. Now if this is a lot of information, you're not quite sure what type of accessories is a good fit for you, please reach out to us here at etrailer. We love helping people get sorted with the right stuff for their adventure. But if you have a RAV4 and you have yours loaded up with all types of gear, send in a review and maybe a picture, and that way you can inspire other people along the way. If you're curious about how I got this roof rack on here, stick around. For your installation process, it's very simple. Now you do have the option of simply securing just the landing pad to your roof with a cover or you can install the crossbar and the tower system. I'll show you the differences as you get this installed. I already have the rear bar up on the roof. So let's get the front crossbar together. Start at the roof of your RAV4. I grab a small flat head screwdriver and this is what I use to pry up on the plastic pieces in the flush rail. Fortunately, there's a perfect little spot here to pry up on. So just lift and then remove your plastic piece. There will be four of these total. Now to prep the pads that will go into those pockets. So on the rubber pad you're actually gonna see a indication of where it's supposed to go. So this arrow here is pointing to the front passenger side, so that's perfect. And then we're gonna have our other pieces here. So I'm gonna remove the cover of this mounting bracket and then we're gonna bring this onto its spot on the roof. Fit this on there, and then fit that top bracket into its little tabs and then secure with a bolt and flat washer. And this will go into the hole that was already in there of your RAV4. And then you're gonna have this Allen key that you'll use to tighten down. So tighten all four brackets until that bolt is flush. With all the brackets tightened down and you can always just give a little shake to your system just to double check. There may be a little bit of play of that plastic piece, but the important thing is that that rubber piece does not have any play. If it does, tighten down even more. Now from this point onwards, if you want to have a compact position, you can just go ahead and put that cover on and just leave it like that. This is how people who don't want to have their roof rack installed just yet would leave their mounting system. Now, once you're ready to put the crossbars on, take that cap off and we'll continue with the next step. Your crossbars will have their own kit that has to be installed onto the towers. The kit we have today is for JetStream and HD bars. So you're gonna have pieces that look like this. Starting with a tower, you first need to open it up, so you pinch the top of the door and then this will allow that door to swing open. And then now on the inside you're gonna see this bolt here. So using the tool included with your kit, you're gonna fully loosen that bolt until that gate on the inside reveals the other bolts. So notice how torn up our gate is. That's because people have tried to access this bolt without fully losing it. So yours will not look like that. Once that gate is fully open, you can then install this plastic piece first. This just drops in and then you can put this metal piece over the middle. So see there's a bolt in there Well, that metal piece will now thread together if you get your tool and start tightening that down. Now don't tighten it all the way, you just want it barely threaded on. With this loose, you'll be able to slide the tower onto the crossbar. So what I like to do is when I remove the end cap out of the crossbar, I can then slide both towers in from that side, just get that facing each other, just like that. And then we can put the end cap in front of it to secure. After pushing this one tower all the way towards the other end, I then get to tighten it down with the included tool. So with this tool, whenever you're tightening down bolts, you wanna keep going until it clicks. This will prevent over tightening and make sure you have proper tension. Now I have found that sometimes over time the towers don't quite move when you have them fully tightened down. So if that's the case for you and you need to get it into its proper position first and then tighten it down there, then this is the part where you would do that. So first, with it in the open position, you're gonna lift each side of the tower into its bracket, and with the door open, you will be able to just drop it into place. In my case, I do have to move the tower a little bit further out on this side in order to get it to fit into place. And then I can close the door, which then snaps that tower into its bracket. Now something you wanna look for is the overhang on each side. You want an equal amount of overhang, and that way you know it's even. If you need to adjust, move the towers back and forth till you have that equal length. And like I talked about, some people loosen the towers, make that easier, and then tighten it down And once they know exactly where it needs to go, that's gonna be an option available for you as well. Once you're happy with where they are on both sides, then go ahead and close that gate on all the towers, again tightening down to proper tension. And then you can now close this cover, which secures it into the bracket. Here you have a plastic end cap. That's what I use and how I use my towers. But if you have the extra Yakima same key system lock cores, you can replace these small lock caps with those metal lock caps instead for extra security. And here's some final touch up things. There are some rubber strips included with your crossbars. You'll want to cut those up to size to fit underneath the crossbars, that way this won't have a whistling sound when you go down the road. You are also gonna have some extra pieces here. So your vehicle flush rail caps along with your tools, your Allen keys, as well as the cover caps. When you're not using your crossbars, I put them all in one of the Yakima boxes and store them inside of the vehicle so that they're ready for whenever you need to adjust your system. With all that being said, that's gonna be it for the installation of your Yakima roof rack. You're now ready to load this up with all the gear for all of your adventures and hit the road with your 2022 Toyota RAV4. My name's Evangeline. Hopefully this helped you out.


Do you have a question about this Roof Rack?
Info for this part was:
At etrailer we provide the best information available about the products we sell. We take the quality of our information seriously so that you can get the right part the first time. Let us know if anything is missing or if you have any questions.


Thank you! Your comment has been submitted successfully. You should be able to view your question/comment here within a few days.
Error submitting comment. Please try again momentarily.